By Dan Winchester, 3925
Even with many Thistles reaching impressive ages, chain plate failures are rare but can occur. This can result from many hours of continued stressing with the eventual failure of the fastenings, or it can be the result of the backing material being attacked by our friendly fungus “dry rot”.
As with most boat repairs, this can be correct by the average boat owner that has a little skill with hand tools. The following page provides one approach to making a successful repair that can be handled by most Thistle owners.
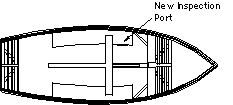
Any attempt to reattach the chain plate from the outside by simply filling the holes and refastening with wood or sheet metal screws will be highly suspect and probably fail in the future. The only way to really fix the problem is to install new through bolt fastenings and if the backing plates have disintegrated, then new backing plates also. Unless you have very long double jointed arms that can reach from the existing inspection port to the front of the tank then the best way to proceed is to install inspection ports in the side of the seat tank a little aft of the front corner (see Figure 1). If the inspection port is installed in the correct place it will also give access to the through bolts under the thwart, which is another area that should be examined. The trade off is that as the inspection port is moved aft to give access to the thwart it makes it harder to work on the chain plates. If the original backing plates are wood and still sound, fill the holes with epoxy and micro fibers and re-drill new holes through the epoxy to install new through bolts with fender washers on the inside with locking nuts.
If the backing plates are rotten, then remove them, or better yet talk your crew into removing them. It is a very humbling experience since some parts of the wood will be sounder then other parts and just won’t come out easily and working through a 4 inch hole does not make for an easy job.
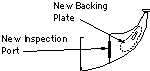
You will now need to install new backing plates. A number of materials can be used including epoxy coated plywood, however I would recommend multiple layers of fiberglass laid up on a flat surface until it is about three sixteenths to a quarter inch thick. It should be as large as you can get through the hole you cut for the new inspection port, before the new port is installed (see fig 2). The new backing plate is dry fit and while held in place holes are drilled through the old holes and new backing plate. Then the new backing plate is removed and the back is buttered with epoxy mixed with micro fibers or fairing compound. It is then put back in place and the chain plate reinstalled with through bolts, fender washers and locking nuts.
After the above is done the new inspection port is installed. If the side of your tank is relatively flat then just caulk and pop rivet the new port in place. If the side of the tank is curved, rough up the surface under the flange of the new inspection port and use some body filler with fiber-glass fibers in it on the back of the port. Lightly press port in place and let the body filler cure, then drill and pop-rivet. Be very meticulous with the body filler and you will have a very neat looking job with an inspection port that can be screwed in and out easily.
Note: While working through the new inspection port hole, before you install the new inspections port, you will find that if a raw edge is left exposed your arm will become infested with millions of small fiber-glass slivers and itch for days. Putting a small strip of “boat tape” (alias duct tape) over the raw edge will make life much more pleasant.