By Dan Winchester, 3925
Introduction
Building and installing Thistle rails is a rather straight forward process and can be accomplished from scratch by anyone with a little woodworking experience. The basic technique requires building the inner wales by laying up three pieces of 1″ x 3/4″ lumber in a jig so that when it is removed from the jig the finished curve approximates the curve of the side of a boat. The second step requires the cutting of the outer wale, and then the installation of the inner wales and outer wales to create the new rails on the boat. The technique described here includes the information necessary to build a jig as well as the process to lay-up the rails and to glue up the inner wales and the complete installation of inner wales and outer wales.
Different manufacturers had slightly different techniques in their construction, that may require some modification in these procedures if only a single rail is to be replaced and it is to match an existing rail. If both rails are to be replaced the procedure outlined here can be followed for virtually all manufacturers hulls. For example, on the Clark boats the hull extends through the rail and is visible on the top and if only one rail is replaced it is desirable to copy this technique so that the rails will look similar.
The Rail Jig
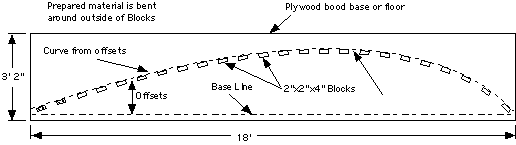
The rail jig is the key to building new rails. The offsets shown here were taken from the original Clark jigs that the Pacific Northwest District now owns. Rails from this jig have been used on Clark, McLaughlin, Shock, D&M and Fox hulls. The rail generated from the jig never matches exactly but is flexible enough that when installed properly will easily fit any hull. Each time a rail is laid up there will be differences in the curves just because the wood used will vary in stiffness characteristics. The original jig laid up 2 rails simultaneously, one on either side of the curve generated by these offsets, but for one time applications it is much easier to lay up the rails on one side of the curve and do one rail one day and another rail the following day.
The original jig used wedges to create clamping force however if you have lots of C-Clamps or other clamps then the jig can be much simpler. I set mine up to use wedges because I did not have the 30 or so clamps required. The jig I describe here assumes you can beg borrow or steal enough clamps. I will add an addendum on how to do it with wedges.
Rail Jig Offsets
| Baseline offset ft |
Offset from baseline inches |
Baseline offset ft |
Offset from baseline inches |
Baseline offset ft |
Offset from baseline inches |
||
| 0 | 1/4 | 1/2 | 4 1/8 | 1 | 8 1/4 | ||
| 1 1/2 | 11 7/8 | 2 | 14 13/16 | 2 1/2 | 17 3/8 | ||
| 3 | 19 1/2 | 3 1/2 | 21 5/16 | 4 | 22 13/16 | ||
| 4 1/2 | 24 1/16 | 5 | 25 1/8 | 5 1/2 | 25 7/8 | ||
| 6 | 26 3/8 | 6 1/2 | 26 3/4 | 7 | 26 7/8 | ||
| 7 1/2 | 27 | 8 | 26 13/16 | 8 1/2 | 26 3/8 | ||
| 9 | 26 | 9 1/2 | 25 7/16 | 10 | 24 3/4 | ||
| 10 1/2 | 23 15/16 | 11 | 23 1/5 | 11 1/2 | 22 1/8 | ||
| 12 | 21 | 12 1/2 | 19 7/8 | 13 | 18 5/8 | ||
| 13 1/2 | 17 7/16 | 14 | 16 1/16 | 14 1/2 | 14 1/2 | ||
| 15 | 13 1/16 | 15 1/2 | 11 3/8 | 16 | 9 5/8 | ||
| 16 1/2 | 8 | 17 | 6 1/4 | 17 1/2 | 4 1/2 | ||
| 18 | 2 5/8 |
Building the Jig
Building the jig will require a surface at least 20 feet long and 4 ft wide with work space around it and to which blocks can be screwed. Several variations of the jig are possible. The one I use allows the use of wedges to create the clamping pressures but if plenty of 6 inch or larger C-clamps or other suitable clamps are available then a much simpler configuration of jig can be built. Requires about 30 Clamps. I will describe doing the job with clamps and also show the wedge method.
Lay out the above offsets on a floor by drawing a straight line 18 feet long marked off at every 6 inch interval. At each 6 inch mark measure out the offset distance and place a mark on the floor. Then using a batten, draw a curved line through these marks.
Cut 30 to 35 2″x2″ blocks 3 to 4 inches long. Pre-drill two holes through each block to avoid splitting with screws.
Using 3 inch screws (sheet rock screws are cheap and work fine) screw these blocks down on the inside of the curve and tangential to the curve at about 8 inch intervals using 2 screws per block (Figure 1). This works best on a wood floor such as the barn floor that I used, but could be done on a concrete floor if you don’t mind putting holes in the concrete and have a hammer drill to make putting holes in the floor reasonably easy. You could also use sheets of 3/4 inch plywood fastened together end to end. You can really make life easy by supporting the plywood with a 2″x4″ frame and putting the whole contraption on saw horses at waist level. This really saves the back. (The production jigs were built this way.) Blocks need to be attached solid enough that they won’t be pulled loose when the rails are bent around them. I had no problems with the sheet rock screws in a wood floor and built multiple rails from one setup. If you want to make clean up easy, you may want to cover the floor with wax paper before starting this process.
After the blocks are screwed down prepare some wood strips about 1/4 ” thick 3/4″ wide and 6 inches long. Tack these strips to the floor crosswise between each block screwed to the floor (Figure 2). These hold the rails off the floor when they are clamped to the blocks. This avoids making the rails a permanent part of the floor, and makes clamping easier.
Preparing Material
Cut 3 strips of wood 18.5+ feet long out of your preferred rail material they should be 3/4 inches in cross dimension and 1+ inch thick. If long enough wood can’t be found you can scarf two pieces together with a 6 to 1 or greater scarf joint. If using scarfed wood try to put scarfs aft of grates, and offset scarfs so that they don’t all occur in the same place in the rail.
Finished rail must be between 5/8″ and 1″. Thicker will be better for stiffness but will add weight so you need to make some tradeoffs based on your boats current weight, the weight of the material used and your feelings about the value of stiffness vs. boat weight.
If using Teak, clean oil from wood with Acetone or Naphtha and let dry. I try to do this several times before gluing.
Laying Up the Rails
Coat one side of one strip (being careful that the 3/4 inch dimension is up) and bend it around the outside of the blocks with glue side away from the blocks. Be very careful not to get any glue between blocks and rail pieces or you will have some very strange looking rails. Putting mylar packaging tape on the face of the blocks helps prevent sticking. Hold this piece in position with a C-clamp at each end. Leave clamps open enough to easily accept all three pieces. Coat the second piece of wood on two sides with glue and slip it into the C-clamp at the bow end and bend it around the first piece. Getting the second and third pieces in usually takes multiple hands and some ingenuity with the clamps. Although I have done it alone it is a lot better to have several sets of helping hands. The third strip of wood is coated only on one side and slipped in just like the second piece. Clamps are added at each block and a rubber mallet or block of wood and hammer is used to make sure all pieces are flush before tightening clamps completely. Start clamping from the bow end and work toward the stern. Don’t over-clamp or you will squeeze to much glue out, creating a starved and weak joint. Rails should be clamped to each block. Add necessary intermediate clamps as necessary to be sure that there are no gaps. If using C-clamps be sure that a protective piece of wood is used between inner wales and clamp.
I found that the Jorgenson Hand Screw clamps worked the best but be careful not to get any glue between them and the rails or they will become permanent parts of the rails. Using a piece of mylar between rail and clamp will ensure this won’t happen. Avoid using wax paper as it will contaminate the wood with wax and make later glue joints weak. Even better is to use a thin strip of wood about 1/4 inch thick by 1 inch high and 19 feet long that has been wrapped in that mylar tape like that used for closing cardboard cartons. This keeps the clamps from damaging the rails and wont stick to either the rails or clamps.
When clamps are removed these rails spring back to a very close approximation to the top of all thistles and it takes very little effort to make them match any boat regardless of manufacturer. Different woods will effect the curve slightly but I have had no problems getting any of them to fit.
Glue Techniques and Notes
For mahogany rails I use West System Epoxy with a small amount of micro fibers mixed in. For teak I have used both West System Epoxy and Urac 88. The Urac 88 is supposed to handle the oil in teak better. I would seriously consider using one of the urethane glues such as Gorilla Glue next time, it is supposed to do very well on teak, is water proof and expands to fill gaps.
Glue should cure in 1 day before removing from the jig. Scrape excess glue off immediately since it will still be slightly softer than when it reaches full cure. If you are lucky enough to have a planer you can run the new rail through it at this point without dulling the blades too much. After more then a day both epoxy and Urac harden to the point that I wouldn’t put them through my planer without removing all excess glue first. If you do plan on Planning the rails start with a little thicker wood. A belt sander with coarse paper also cleans off excess glue very well.
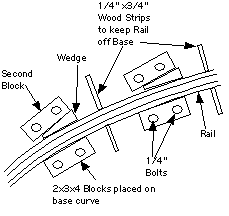
Clamping Using Wedges
If you don’t have enough clamps or are going to build a number of rails then I would recommend a jig designed to use wedges to provide the clamping pressure. Wedges are very fast to use and do an excellent job. The wedge technique requires that a second block be fastened down outside the first and at an angle. Enough room needs to be left between blocks for Rail and the wedge. It would probably be a good Idea to use a 3 inch wide block to provide a better anchor to the plywood or floor. They also need to be fastened down very tightly, since they will take tremendous pressure when the wedge is driven in. Sheet rock screws are not enough, use screws and glue or through bolts.
Attaching Rails to Hull
Fitting the rails at the bow. Move rail back and forward until the curve at the front portion of inner wale best matches the curve of the boat from the grate position forward (this is the hardest area to fit). At the bow rough cut the extra material off so that it fits down inside the hull at that point and then temporarily clamp in position inside hull working from front to back. I place about 3 2x4s across the hull to help in this process with a block clamped to the bottom side opposite where the rail is being fit so that it won’t slide as the rail is pushed or pulled until it fits the hull. I don’t normally cut the extra material off the transom end of the new inner wales until I get a reasonably good fit even if I have to do some of the work mentioned in the fitting rails to sides section below.
When the rail fits well then mark the bow at the center line and make a final cut. Remember, more can always be trimmed off but once cut off you can’t add it back so proceed with caution.
Side two is about the same, except that the bow must be cut to fit the first rail.. A belt sander is always handy for making final adjustments to the end cuts if only a little bit needs to be removed. (I have found that a Japanese back saw makes this kind of fitting much easier.)
Fitting Rails to Sides
Relieving or beveling the bottom edge of the rails where they contact the hull is necessary until the top edge contacts the hull reasonably well.
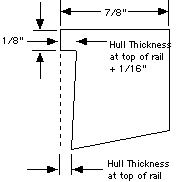
Most of the fiberglass hulls have a vertical section at the top edge of the hull which allows the rails to be fitted with a minimum of hand work but even the best require some relieving along the bottom edge to allow the top edge of the rail to lay against the hull. Don’t touch the top 1/8 inch of the rail because this is the surface to which the outer wale must fit perfectly. I use a small block plane to do most of this work and do not worry about removing to much from the bottom edge since it will not be seen and will be filled with epoxy when attaching rails to hull. With wood hulls there is no flat section so most of the inner wale needs to be beveled with the plane so that it has a good fit along the top edge. Again as with the glass hull a little extra gap on the bottom can be filled with epoxy, but the fit on the top is critical since it is a visible joint when completed.
During the total fitting operation be sure that the inner wales are held perfectly flat. This is done with the 2x4s laid across the hull and the inner wales clamped to them. (see Installing Rails below)
Fitting at Transom
When the bow is cut and the sides fit then cut the rail to length at the transom. If this is cut too soon, before most of the other fitting is done then it will always end up slightly short.
Cut and Prepare the Outer Wale
Outer wales differ somewhat in profile and configuration depending on type and brand of boat. For most glass boats the outer wale is rabbeted such that a small flange will cover the top of the hull thus hiding the raw edge of the glass. On wood boats and Clark glass boats the hull comes clear through the rail. For this reason the dimensions of the outer wale must be adjusted to give the maximum legal rail width. The outer wales are typically tapered slightly on the bottom such that they are full thickness at the hull and a little narrower at the outer edge. This tends to make things look a little better to my eye.
Pre-drill outer wales for screws and for plugs to cover screw heads. Distance between holes tends to very from manufacturer to manufacturer. I found that 9 inches seems to be a good compromise.
Installing Rail
It is important to keep the rails flat while fitting and attaching them. I do this by laying several 2x4s across the boat and using C-clamps to clamp the rails to these 2x4s. I have typically used 3 2x4s one at back of grates, one at aft end of seat tanks and one at stern. Mark these with the girth measurements so that rails can be clamped at proper width while installing. Clamp a block on the side opposite where the rail is being installed so that the 2×4 is kept at the marked girth position.
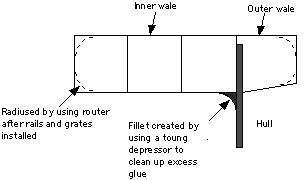
After the inner wales are dry fit and the outer wales fully prepared, the inner wales are then placed in position with plenty of fairing compound (West Resin with slow hardener and fairing material mixed into a peanut butter consistency) between inner wale and hull. Inner wale is pushed into position and clamped to 2x4s laid across top of hull side to side. (This assures that rail is flat.) The outer wale is then placed in position with plenty of fairing compound. Long screws are then used to screw through the outer wale into the inner wales. Screws should be long enough to penetrate about 1/2 inch into inner lamination of inner wale. Start at bow, pre-drill pilot hole for each screw and drive it home before starting next screw. Be careful to keep the outer wale flat up against the 2x4s laying across the top of boat. Let the fairing compound fill any gaps that are caused by the rail not being square to the hull. Clean up fairing compound before it sets. Use a tongue depressor on the inside under the rail and leave a small fillet. You may need to add an occasional clamp if there are any gaps where the outlaw meets the hull or inner wale. Normally the screws do the job. The second rail can be installed immediately or at a later time. Install grates and then rout edges of rails and grates.
Good luck and have fun.